Install docker swarm and configure cluster

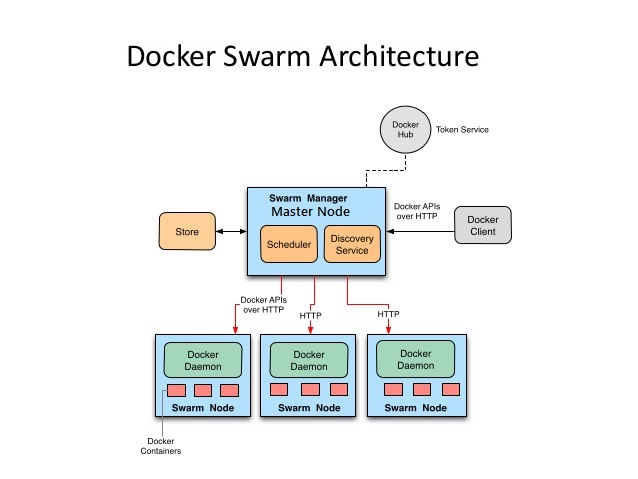
Docker Swarm is a native clustering for Docker. The best part is that it exposes standard Docker API meaning that any tool that you used to communicate with Docker (Docker CLI, Docker Compose, Dokku, Krane, and so on) can work equally well with Docker Swarm. That in itself is both an advantage and a disadvantage at the same time. Being able to use familiar tools of your own choosing is great but for the same reasons we are bound by the limitations of Docker API. If the API doesn’t support something, there is no way around it through Swarm API and some clever tricks need to be performed.

Install Docker Swarm and configure cluster is easy, straightforward and flexible. All we have to do is install one of the service discovery tools and run the swarm container on all nodes. The first step to creating a swarm on your network is to pull the Docker Swarm image. Then, using Docker, you configure the swarm manager and all the nodes to run Docker Swarm.

docker swarm

This method requires that you:

  • open a TCP port on each node for communication with the swarm manager
  • install Docker on each node
  • create and manage TLS certificates to secure your swarm

How to install docker swarm and configure cluster

Install Docker on all the nodes and start with docker API. Use the following command to start it. This will be better to run from screen. I have used 3 node servers in my environment.

Master/node1 : ip-10-0-3-227
node2 : ip-10-0-3-226
node3 : ip-10-0-3-228

Login your all servers and start docker with API.

#docker -H tcp://0.0.0.0:2375 -d &

Install Docker swarm on the master node and create a swarm token using the following command.

[root@ip-10-0-3-227 ~]# docker -H tcp://10.0.3.227:2375 run --rm swarm create 

f63707621771250dc3925b8f4f6027ae

Note down this swarm token generated by the above command as you need it for the entire cluster set up.

Now login all your node servers and execute the following following to join with docker swarm.

Node1

Syntax Example

docker -H tcp://<node_1_ip>:2375 run -d swarm join –addr=<node1_ip>:2375 token://<cluster_token>

[root@ip-10-0-3-226 ~]#docker -H tcp://10.0.3.226:2375 run -d swarm join --addr=10.0.3.226:2375 token://f63707621771250dc3925b8f4f6027ae
 Unable to find image 'swarm:latest' locally
 latest: Pulling from docker.io/swarm
 ff560331264c: Pull complete
 d820e8bd65b2: Pull complete
 8d00f520df22: Pull complete
 e006ebc1de3a: Pull complete
 7390274120a7: Pull complete
 0036abe904ed: Pull complete
 bd420ed092aa: Pull complete
 8db3c7d27267: Pull complete
 docker.io/swarm:latest: The image you are pulling has been verified. Important: image verification is a tech preview
 feature and should not be relied on to provide security.
 Digest: sha256:e72c009813e43c68e01019df9d481e3009f41a26a4cad897a3b832100398459b
 Status: Downloaded newer image for docker.io/swarm:latest
 d04d00d5afacc37f290b92ed01658eca147c5510533d9cb0a0dfc1aa20edfcef

Node2

[root@ip-10-0-3-228 ~]# docker -H tcp://10.0.3.228:2375 run -d swarm join --addr=10.0.3.228:2375

Verify the swarm setup on your node server using the following command.

[root@ip-10-0-3-226 ~]# docker -H tcp://10.0.3.226:2375 ps
CONTAINER ID IMAGE COMMAND CREATED STATUS PORTS NAMES
d04d00d5afac swarm "/swarm join --addr= 2 minutes ago Up 2 minutes 2375/tcp 
sleepy_engelbart

Replace the ip address and check with all the node servers.

Now try to join all the nodes to the cluster, set up a swarm manager on the swarm master node using the following command.

[root@ip-10-0-3-227 ~]# docker -H tcp://10.0.3.227:2375 run -d -p 5000:5000 swarm manage token://f63707621771250dc3925b8f4f6027ae

To list all the nodes in the cluster, execute the following Docker command from the docker client node.

[root@ip-10-0-3-227 ~]# docker -H tcp://10.0.3.227:2375 run --rm swarm list token://f63707621771250dc3925b8f4f6027ae
10.0.3.227:2375
10.0.3.226:2375
10.0.3.228:2375

Execute the following command from the client and it will show the node server details.

Syntax

docker -H tcp://<node_ip>:2375 info

[root@ip-10-0-3-227 ~]#docker -H tcp://10.0.3.226:2375 info

Next test your cluster set up by deploying a container onto the cluster. For example, Run a test busybox container from the docker client using the following command.

root@ip-10-0-3-227 ~]# docker -H tcp://10.0.3.227:2375 run -dt --name swarm-test busybox /bin/sh

Now list the running docker container using the following command.

[root@ip-10-0-3-227 ~]# docker -H tcp://10.0.3.227:2375 ps
CONTAINER ID IMAGE COMMAND CREATED STATUS PORTS  NAMES 
6aaec7894903 busybox "/bin/sh" 2 hours ago Up 2 hours swarm-test 
7d1e74741eb1 swarm "/swarm manage token 2 hours ago Up 2 hours 2375/tcp, 0.0.0.0:5000->5000/tcp goofy_lalande 
f0b654832976 swarm "/swarm join --addr= 2 hours ago Up 2 hours 2375/tcp sharp_carson

That it. This is the steps to install docker swarm and configure cluster.


Install openstack liberty using packstack

Packstack is a utility that uses Puppet modules to deploy various parts of OpenStack on multiple pre-installed servers over SSH automatically. This utility is still in the early stages, a lot of the configuration options have yet to be added Currently its support Fedora, Red Hat Enterprise Linux (RHEL) and compatible derivatives of both are supported. Here we can discuss to Install openstack liberty using packstack in centos server.

packstack

How to install OpenStack liberty using packstack in centos 7


Update all your existing packages.

#yum update -y

Install all other useful tools

#yum install -y wget net-tools mlocate

Flush yum cache

#yum clean all #yum repolist

Set the Selinux in Permissive Mode

# setenforce 0

Disable firewalld & NetworkManager Service

# systemctl stop firewalld
# systemctl disable firewalld
Removed symlink /etc/systemd/system/dbus-org.fedoraproject.FirewallD1.service.
Removed symlink /etc/systemd/system/basic.target.wants/firewalld.service.

# systemctl stop NetworkManager
# systemctl disable NetworkManager
Removed symlink /etc/systemd/system/multi-user.target.wants/NetworkManager.service.
Removed symlink /etc/systemd/system/dbus-org.freedesktop.NetworkManager.service.
Removed symlink /etc/systemd/system/dbus-org.freedesktop.nm-dispatcher.service.


Install packstack repos.

#wget https://repos.fedorapeople.org/repos/openstack/openstack-liberty/rdo-release-liberty-2.noarch.rpm
#rpm -ivh rdo-release-liberty-2.noarch.rpm

Install openstack packstack

yum install -y openstack-packstack

Generate a openstack answerfile and customize your services to enable and disable components, also make sure to update the management IP address.

#packstack --gen-answer-file=youranwserfile.packstack

NOTE: If you want to ssl support for the horizon you need to install your certs into /etc/ssl/certs and enable SSL
CONFIG_HORIZON_SSL=y

Once the modification is done.

Install packstack

#packstack --answer-file=youranwserfile.packstack

It will take few minutes to complete that installation and will update admin user credential and demo user credential.


**** Installation completed successfully ******

Additional information:
* A new answerfile was created in: /root/packstack-answers-20160105-040349.txt
* Time synchronization installation was skipped. Please note that unsynchronized time on server instances might be problem for some OpenStack components.
* Warning: NetworkManager is active on 127.0.0.1. OpenStack networking currently does not work on systems that have the Network Manager service enabled.
* File /root/keystonerc_admin has been created on OpenStack client host 127.0.0.1. To use the command line tools you need to source the file.
* To access the OpenStack Dashboard browse to http://127.0.0.1/dashboard .
Please, find your login credentials stored in the keystonerc_admin in your home directory.
* To use Nagios, browse to http://127.0.0.1/nagios username: nagiosadmin, password:
* The installation log file is available at: /var/tmp/packstack/20160105-040348-S2GgMl/openstack-setup.log
* The generated manifests are available at: /var/tmp/packstack/20160105-040348-S2GgMl/manifests


Once the installation is completed,

Setup network bridge for external network

In order to connect OpenStack with external network, you should configure network bridge on your server. Install and configuration network bridge

Next add the following to the /etc/neutron/plugin.ini file.

network_vlan_ranges = physnet1
bridge_mappings = physnet1:br-ex

Restart network and nuetron services.

Setup cinder-volumes to your secondary drive

After you installed openstack using packstack, default it will create 20G cinder volume. If you need to modify cinder volume with your secondary drive.

remove your old volume group cinder volume

#vgremove cinder-volumes

Create physical volume from your secondary drive

#pvcreate /dev/sdb

Create volume group using that physical volume.

#vgcreate cinder-volumes /dev/sdb

That’s it.


Verify your installation and admin credential.

keystonerc_admin keystonerc_demo

[root@openstack-liberty ~(keystone_admin)]#source /root/keystone_admin
[root@openstack-liberty ~(keystone_admin)]# nova image-list
+--------------------------------------+--------+--------+--------+
| ID | Name | Status | Server |
+--------------------------------------+--------+--------+--------+
| 0aecad86-309f-43fc-925c-a6c9bba81b6f | cirros | ACTIVE | |
+--------------------------------------+--------+--------+--------+
[root@openstack-liberty ~(keystone_admin)]# nova hypervisor-list
+----+--------------------------------+-------+---------+
| ID | Hypervisor hostname | State | Status |
+----+--------------------------------+-------+---------+
| 1 | openstack-liberty.apporbit.com | up | enabled |
+----+--------------------------------+-------+---------+

That’s it, You can login openstack horizon dashboard.

http://10.47.13.196/dashboard/


Errors:
1) ERROR : Error appeared during Puppet run: 10.47.13.196_ring_swift.pp
Error: /Stage[main]/Swift::Ringbuilder/Swift::Ringbuilder::Rebalance[object]/Exec[rebalance_object]: Failed to call
refresh: swift-ring-builder /etc/swift/object.builder rebalance returned 1 instead of one of [0]

Solutioin

Remove everything in /etc/swift/* then try to install packstack again.

2) Error: Unable to retrieve volume limit information.

Solutioin

vi /etc/cinder/cinder.conf
[keystone_authtoken] auth_uri = http://192.168.1.10:5000
auth_url = http://192.168.1.10:35357
auth_plugin = password
project_domain_id = default
user_domain_id = default
project_name = services
username = cinder
password = eertr6645643453


Enable thin provisioning for the cinder volume

Add the following entries under your driver section i.e. [lvm]

vi /etc/cinder/cinder.conf

volume_clear = none
lvm_type = thin
volume_clear_size = 0

change the following values in nova configuration.

vi /etc/nova/nova.conf

volume_clear=none
volume_clear_size=0

restart both nova and cinder services.


kubernetes installation and configuration on centos 7

Kubernetes is an open-source platform for automating deployment, scaling, and operations of application containers across clusters of hosts. It aims to provide better ways of managing related, distributed components across varied infrastructure.

Kubernetes is,

  • lean: lightweight, simple, accessible
  • portable: public, private, hybrid, multi-cloud
  • extensible: modular, pluggable, hookable, composable
  • self-healing: auto-placement, auto-restart, auto-replication

Kubernetes has several components and it works in server-client setup, where it has a master providing centralized control for a number of minions.

etcd – A highly available key-value store for shared configuration and service discovery.
flannel – an overlay network fabric enabling container connectivity across multiple servers.
kube-apiserver – Provides the API for Kubernetes orchestration.
kube-controller-manager – Enforces Kubernetes services.
kube-scheduler – Schedules containers on hosts.
kubelet – Processes a container manifest so the containers are launched according to how they are described.
kube-proxy – Provides network proxy services.
Docker – An API and framework built around Linux Containers (LXC) that allows for the easy management of containers and their images.

kubernetes cluster with docker

How to install Kubernetes and setup minions in centos 7

We are using the following example master and minon hosts. You can add many extra nodes using the same installation procedure for Kubernetes nodes.

kub-master = 192.168.1.10
kub-minion1 = 192.168.1.11
kub-minion2 = 192.168.1.12

Prerequisites

1) Configure hostnames in all the nodes /etc/hosts file.

2) Disable iptables on the all nodes to avoid conflicts with Docker iptables rules:

# systemctl stop firewalld
# systemctl disable firewalld
3) Install NTP on the all nodes and enabled

# yum -y install ntp
# systemctl start ntpd
# systemctl enable ntpd

Setting up the Kubernetes Master server

4) Install etcd and Kubernetes through yum:

# yum -y install etcd kubernetes docker
5) Configure etcd to listen to all IP addresses.

# vi /etc/etcd/etcd.conf.

ETCD_NAME=default
ETCD_DATA_DIR="/var/lib/etcd/default.etcd"
ETCD_LISTEN_CLIENT_URLS="http://0.0.0.0:2379"
ETCD_ADVERTISE_CLIENT_URLS="http://localhost:2379"

6) Configure Kubernetes API server

vi /etc/kubernetes/apiserver

KUBE_API_ADDRESS="--address=0.0.0.0"
KUBE_API_PORT="--port=8080"
KUBELET_PORT="--kubelet_port=10250"
KUBE_ETCD_SERVERS="--etcd_servers=http://127.0.0.1:2379"
KUBE_SERVICE_ADDRESSES="--service-cluster-ip-range=10.254.0.0/16"
KUBE_ADMISSION_CONTROL="--admission_control=NamespaceLifecycle,NamespaceExists,LimitRanger,SecurityContextDeny,ResourceQuota"
KUBE_API_ARGS=""

7) Use the following command to enable and start etcd, kube-apiserver, kube-controller-manager and kube-scheduler services.

# for SERVICES in etcd kube-apiserver kube-controller-manager kube-scheduler; do
 systemctl restart $SERVICES
 systemctl enable $SERVICES
 systemctl status $SERVICES 
done

8) Install and configure flannel overlay network fabric configuration to communicate each others minions:

# yum -y install flannel

Configure private ip address with flannel.

# etcdctl mk /atomic.io/network/config ‘{“Network”:”10.10.0.0/16″}’

Thats it.

Setting up Kubernetes Minions Nodes Servers

1) Login your minion server Install flannel and Kubernetes, Docker using yum

# yum -y install docker flannel kubernetes
2) Point flannel to the etcd server.

vi /etc/sysconfig/flanneld

FLANNEL_ETCD="http://192.168.1.10:2379"

3) Update Kubernetes config to connect Kubernetes master API server

vi /etc/kubernetes/config

KUBE_MASTER="--master=http://192.168.1.10:8080"

4) Configure kubelet service

vi /etc/kubernetes/kubelet

KUBELET_ADDRESS="--address=0.0.0.0"
KUBELET_PORT="--port=10250"
# change the hostname to this host’s IP address
KUBELET_HOSTNAME="--hostname_override=192.168.1.11"
KUBELET_API_SERVER="--api_servers=http://192.168.1.10:8080"
KUBELET_ARGS=""

Thats it.. You can do the same steps on your all minions.

5) Start and enabled all the services.

for SERVICES in kube-proxy kubelet docker flanneld; do
 systemctl restart $SERVICES
 systemctl enable $SERVICES
 systemctl status $SERVICES 
done

Verify your flannel network interface.

#ip a | grep flannel | grep inet

Now login to Kubernetes master node and verify the minions’ status:

#kubectl get nodes

Thats it.. Verify your minion nodes are running fine.