SaltStack installation on Centos 7

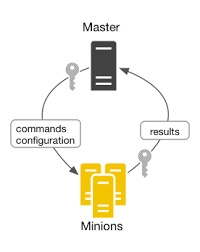
SaltStack, or Salt is a tool which is open source configuration management software and remote execution engine, code deployment and communication topologies. Salt competes with popular cofiguration management tools like chef and puppet. Salt claims to scale up to tens and thousands of servers. Salt has been designed to be highly modular and easily extensible. The design goal is to make Salt easily moldable to diverse applications.

  • There is a master server and it connects to the agent servers (called minions) in your infrastructure.
  • The master can run commands in the minions parallelly, it is what make salt very fast.
  • The minions will execute the command sent by master and return it.

saltstack architecture

SaltStack installation on centos 7 server.

Login your master server.

Master – 192.168.1.5

To install using the SaltStack repository

rpm --import https://repo.saltstack.com/yum/redhat/7/x86_64/latest/SALTSTACK-GPG-KEY.pub

vi /etc/yum.repos.d/saltstack.repo

[saltstack-repo]
name=SaltStack repo for RHEL/CentOS $releasever
baseurl=https://repo.saltstack.com/yum/redhat/$releasever/$basearch/latest
enabled=1
gpgcheck=1
gpgkey=https://repo.saltstack.com/yum/redhat/$releasever/$basearch/latest/SALTSTACK-GPG-KEY.pub
#yum clean expire-cache
#yum update.

Install the salt-minion, salt-master, or other Salt components:

yum install salt-master
yum install salt-minion
yum install salt-ssh
yum install salt-syndic
yum install salt-cloud
#chkconfig salt-master on
#service salt-master start

Configure Master Configuration

Salt configuration is very simple. The default configuration for the master will work for most installations and the only requirement for setting up a minion is to set the location of the master in the minion configuration file.

The configuration files will be installed to /etc/salt and are named after the respective components, /etc/salt/master, and /etc/salt/minion.

By default the Salt master listens on ports 4505 and 4506 on all interfaces (0.0.0.0). To bind Salt to a specific IP, Change the interface conf in /etc/salt/master.

Find:

# The address of the interface to bind to
#interface: 0.0.0.0

Replace with:

# The address of the interface to bind to
interface: youripaddress

in my case, I have given interface: 192.168.1.5

Setting the states file_roots directory

All of salt’s policies or rather salt “states” need to live somewhere. The file_roots directory is the location on disk for these states. For this article we will place everything into /salt/states/base.

Find:

#file_roots:
#base:
#- /srv/salt

Replace with:

file_roots:
 base:
 - /salt/states/base

Setting the pillar_roots

The last item that we need for now is the pillar_roots dictionary. The pillar system is used to store configuration data that can be restricted to certain nodes. This allows us to customize behavior and to prevent sensitive data from being seen by infrastructure components not associated with the data. This format mirrors the file_roots exactly. The location of our pillar data will be at /srv/pillar:

Find:

#pillar_roots:
#base:
#- /srv/pillar

Replace:

pillar_roots:
 base:
 - /salt/pillars/base


Created those folders.

# mkdir /salt/pillars/base
# mkdir /salt/states/base

Restart the salt-master service

# service salt-master restart
Redirecting to /bin/systemctl restart salt-master.service

Thats it..

Configure the Salt-Minion Configuration

minion – 192.168.1.6

Install SaltStack repository and update repos as before in /etc/yum.repos.d/saltstack.repo.

Install salt minion

#yum install salt-minion

Update your salt master connection details.

# vi /etc/salt/minion

Find:

#master: salt

Replace with:

master: yourmasterip

in my case, I have given interface: 192.168.1.5

# service salt-minion restart
Redirecting to /bin/systemctl restart salt-minion.service

Thats it.. Once the salt-minion service is restarted the minion will start trying to communicate with the master. Go to Master node server and accept the Minions keys.

List the available keys

[root@localhost ~]# salt-key -L
Accepted Keys:
Denied Keys:
Unaccepted Keys:
192.168.1.6
Rejected Keys:

Accept the minion key

[root@localhost ~]# salt-key -a 192.168.1.6
The following keys are going to be accepted:
Unaccepted Keys:
209.205.208.100
Proceed? [n/Y] y
Key for minion 192.168.1.6 accepted.

To list all the accepted keys

#salt-key --list all
SENDING COMMANDS

Communication between the Master and a Minion may be verified by running the test.ping command:

# salt 192.168.1.6 test.ping
192.168.1.6:
 True

To list all minion

# salt '*' test.ping
192.168.1.6:
 True
minion2:
 True
minion3:
 True
minion4:
 True

To check minion disk usage

# salt '192.168.1.6' disk.usage
192.168.1.6:
 ----------
 /:
 ----------
 1K-blocks:
 37329092
 available:
 36223528
 capacity:
 3%
 filesystem:
 /dev/mapper/centos-root
 used:
 1105564


Enable Outbound simple NAT on FirewallD

Firewalld

firewalld provides a dynamically managed firewall with support for network “zones” to assign a level of trust to a network and its associated connections and interfaces. It has support for IPv4 and IPv6 firewall settings. It supports Ethernet bridges and has a separation of runtime and permanent configuration options. It also has an interface for services or applications to add firewall rules directly.

Network Zones

Firewalls can be used to separate networks into different zones based on the level of trust the user has decided to place on the devices and traffic within that network. NetworkManager informs firewalld to which zone an interface belongs. An interface’s assigned zone can be changed by NetworkManager or via the firewall-config tool which can open the relevant NetworkManager window for you.

The zone settings in /etc/firewalld/ are a range of preset settings which can be quickly applied to a network interface.

  • drop: The lowest level of trust. All incoming connections are dropped without reply and only outgoing connections are possible.
  • block: Similar to the above, but instead of simply dropping connections, incoming requests are rejected with an icmp-host-prohibited or icmp6-adm-prohibited message.
  • public: Represents public, untrusted networks. You don’t trust other computers but may allow selected incoming connections on a case-by-case basis.
  • external: External networks in the event that you are using the firewall as your gateway. It is configured for NAT masquerading so that your internal network remains private but reachable.
  • internal: The other side of the external zone, used for the internal portion of a gateway. The computers are fairly trustworthy and some additional services are available.
  • dmz: Used for computers located in a DMZ (isolated computers that will not have access to the rest of your network). Only certain incoming connections are allowed.
  • work: Used for work machines. Trust most of the computers in the network. A few more services might be allowed.
  • home: A home environment. It generally implies that you trust most of the other computers and that a few more services will be accepted.
  • trusted: Trust all of the machines in the network. The most open of the available options and should be used sparingly.

To use the firewall, we can create rules and alter the properties of our zones and then assign our network interfaces to whichever zones are most appropriate.

How to enable FirewallD Simple NAT on your CentOS7

You can Enable Outbound simple NAT on FirewallD using centos7 server.

Start your Firewalld

# systemctl start firewalld.service


Enable IP Forwarding

sysctl -w net.ipv4.ip_forward=1

Check with your network interface.

ens160: flags=4163<UP,BROADCAST,RUNNING,MULTICAST> mtu 1500
inet 192.168.1.10 netmask 255.255.255.0 broadcast 192.168.1.255
inet6 fe80::20c:29ff:fecc:ac0c prefixlen 64 scopeid 0x20<link>
ether 00:0c:29:cc:ac:0c txqueuelen 1000 (Ethernet)
RX packets 354931 bytes 23015677 (21.9 MiB)
RX errors 0 dropped 52 overruns 0 frame 0
TX packets 6896 bytes 626333 (611.6 KiB)
TX errors 0 dropped 0 overruns 0 carrier 0 collisions 0

ens192: flags=4163<UP,BROADCAST,RUNNING,MULTICAST> mtu 1500
inet 104.24.101.150 netmask 255.255.255.224 broadcast 104.24.101.145
inet6 fe80::20c:29ff:fecc:ac16 prefixlen 64 scopeid 0x20<link>
ether 00:0c:29:cc:ac:16 txqueuelen 1000 (Ethernet)
RX packets 537458 bytes 41460161 (39.5 MiB)
RX errors 0 dropped 59 overruns 0 frame 0
TX packets 195260 bytes 47842690 (45.6 MiB)
TX errors 0 dropped 0 overruns 0 carrier 0 collisions 0
We are using ens160 as private network and ens192 as public network.

simple NAT on firewalld

Check your firewalld current lists on your VM1

# firewall-cmd --list-all
# firewall-cmd --list-all --zone=external

Add public interface as public zone permanent.

# firewall-cmd --change-interface=ens192 --zone=external --permanent

Restart Firewalld

# firewall-cmd --complete-reload
# firewall-cmd --list-all --zone=external

Configure private as internal zone permanent.

# firewall-cmd --change-interface=ens160 --zone=internal --permanent

Configure internal zone as default

# firewall-cmd --set-default-zone=internal

Restart Firewalld

# firewall-cmd --complete-reload

Add DNS service as permanent

# firewall-cmd --zone=internal --add-service=dns --permanent
# firewall-cmd --complete-reload

You can verify external zone

# firewall-cmd --list-all --zone=external

Done.

Login your Private Network server and configure the ens160 IP address as the gateway.

# ssh root@192.168.1.15

ping your external network

ping google.com

Example video

https://www.youtube.com/watch?v=stdqaG-DMv8


what is VMware memory balloon driver

The memory balloon driver (vmmemctl) collaborates with the server to reclaim pages that are considered least valuable by the guest operating system. The driver uses a proprietary ballooning technique that provides predictable performance that closely matches the behavior of a native system under similar memory constraints. This technique increases or decreases memory pressure on the guest operating system, causing the guest to use its own native memory management algorithms. When memory is tight, the guest operating system determines which pages to reclaim and, if necessary, swaps them to its own virtual disk.

memory balloon

For simple explanation the process where the hypervisor reclaims  memory back from the virtual machine. Ballooning is an activity that happens when the ESXi host is running out of physical memory. The demand of the virtual machine is too high for the host to handle.

First you need to install vmware tools on your VM to works this properly.

Install vmware tools on centos

#yum install open-vm-tools

or you can install it via vmware client or web client

You can use the esxtop and follow the below steps.

1. Connect ESX server via SSH and type esxtop. Default will show the CPU stats. Switch to the memory stats by entering  “m”

2.By default, Memory stats view will not show the balloon drive stats. To add the field, Press “f”

3 Press “j” to add the MCTL stats and Press “Enter” to switch back to the memory stat view
memctl

4. Now lookout for the value MCTL. If “y” means Balloon driver is enabled and running and “N” means Balloon driver not running.

memctl1 vmware
if you only want to see the virtual machines , Press “V”.

Try to monitor your memory balloon when you run application on your VM.