Install and configure chef client on workstation

Chef is a powerful automation platform that transforms complex infrastructure into code, bringing your servers and services to life. Whether you’re operating in the cloud, on-premises, or a hybrid, Chef automates how applications are configured, deployed, and managed across your network, no matter its size.

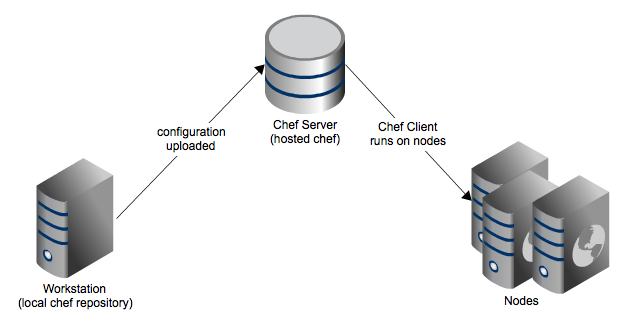
the Chef server stores cookbooks, the policies that are applied to nodes, and metadata that describes each registered node that is being managed by the chef-client. Nodes use the chef-client to ask the Chef server for configuration details, such as recipes, templates, and file distributions.

The chef-client then does as much of the configuration work as possible on the nodes themselves (and not on the Chef server). This scalable approach distributes the configuration effort throughout the organization.

You can use Hosted chef server https://manage.chef.io/signup or install your own chef server.

  • Your workstation ( client ) is the computer from which you author your cookbooks and administer your network. It’s typically the machine you use everyday. Although you’ll be configuring a Red Hat Enterprise Linux server, your workstation can be any OS you choose – be it Linux, Mac OS, or Windows.
  • Chef server acts as a central repository for your cookbooks as well as for information about every node it manages. For example, the Chef server knows a node’s fully qualified domain name (FQDN) and its platform.
  • A node is any computer that is managed by a Chef server. Every node has the Chef client installed on it. The Chef client talks to the Chef server. A node can be any physical or virtual machine in your network.


install and configure chef cient

Chef client knife

knife is a command-line tool that provides an interface between a local chef-repo and the Chef server. knife helps users to manage:

  • Nodes
  • Cookbooks and recipes
  • Roles
  • Stores of JSON data (data bags), including encrypted data
  • Environments
  • Cloud resources, including provisioning
  • The installation of the chef-client on management workstations
  • Searching of indexed data on the Chef server

Download Chef Client

https://www.chef.io/download-chef-client/


Install Chef Client

Install and configure chef client on workstation for CentOS

#wget https://www.chef.io/chef/install.sh
#chmod 755 install.sh
#./install.sh

or

RPM downloads

#wget https://opscode-omnibus-packages.s3.amazonaws.com/el/6/x86_64/chef-12.0.3-1.x86_64.rpm
#rpm -ivh chef-11.4.0-1.el6.x86_64.rpm

Go to your chef server and copy .pem, knife.rb files to your client server

Example

https://manage.chef.io/organizations/

Go to Administration
Click your Organization
Click STarter Kit
Click Download Starter Kit
#unzip chef-starter.zip
#cd chef-repo/
#cp -Rf .chef /root

You can verify your knife.rb details.
[root@chef .chef]# cat knife.rb

# See https://docs.chef.io/config_rb_knife.html for more information on knife configuration options

current_dir = File.dirname(__FILE__)
log_level :info
log_location STDOUT
node_name "node_name"
client_key "#{current_dir}/testuser.pem"
validation_client_name "geminisys-validator"
validation_key "#{current_dir}/sys-validator.pem"
chef_server_url "https://api.opscode.com/organizations/orgname"
syntax_check_cache_path "#{ENV['HOME']}/.chef/syntaxcache"
cookbook_path ["#{current_dir}/../cookbooks"]

Once the installation completed, check the chef version details.

[root@chef]# chef-client -v
Chef: 12.1.0
[root@chef ~]# knife client list
sys-validator

Thats all.. Your chef client configured successfully. You can create node using the knife bootstrap.

Example

Use an SSH password

# knife bootstrap 192.168.1.1 -x username -P PASSWORD
Use a file that contains a private key

# knife bootstrap 192.168.1.1 -x username -i ~/.ssh/id_rsa
To show node

# knife node show <node name>


Docker installation on CentOS 6

Docker is a new container technology and an open platform for developers and sysadmins to build, ship, and run distributed applications. “Containers” are encapsulated, lightweight, and portable application modules. Docker enables apps to be quickly assembled from components and eliminates the friction between development, QA, and production environments.

Basically Docker allows the isolation of processes and their resources without the need of emulating machine hardware and operating system.

  • Dependency requirements of each application are segregated and are individually managed without any conflicts.
  • Simplifies configuration management by putting the dependency management straight into the hands of the developers.
  • The image used in production can also be used in development, which improves consistencies and reduces the amount of times developers say “But it worked on my PC” during the life-cycle of the project.


Docker installation


Docker installation on CentOS 6

Use the below steps to install docker on centos 6

Update EPEL Repository

Docker is part of Extra Packages for Enterprise Linux (EPEL), which is a community repository of non-standard packages for the RHEL distribution.

rpm -iUvh http://dl.fedoraproject.org/pub/epel/6/x86_64/epel-release-6-8.noarch.rpm

Update packages

#yum update -y

install Docker by installing the docker-io package

#yum -y install docker-io

Once the installation completes, start the docker service

#service docker start

#chkconfig docker on
Thats all.. Docker has been installed successfully. You can view command line options.

#docker help


Download docker images

#docker pull centos

This will download centos docker image from docker repository.

Once download completed, check your docker images using this command

#docker images

Create docker container from your centos images
#docker run –name newdocker1 -d centos
log within your container.

#docker exec -it centos bash


Increase root partition size xenserver

XenServer has a tiny installation footprint 1.2 GB (roughly). That is the modern day equivalent of a 1.44″ disk, really. While the installation footprint is tiny, well, so is the “root/boot” partition that the XenServer installer creates 4GB in size. The point is that this amount of space does not facilitate much room for log retention, patch files, and other content. As such, it is highly important to tune, monitor, and perform clean-up operations on a periodic basis. Without attention over time all hotfix files, syslog files, temporary log files, and other forms of data can accumulate until the point with which the root disk will become full.

Refer for more information.
http://xenserver.org/discuss-virtualization/virtualization-blog/entry/xenserver-root-disk-maintenance.html

How to Increase root partition size xenserver

We can use MBR partition tables and get a larger root partition xenserver. Here is the steps to disable GPT support false and use MBR partition table.

  • Boot the xenserver with installation DISK.
  • while initially booting, press F2 to access the advanced installation.
  • Type shell and press enter. This will booting in to a pre-installation shell.
  • vi /opt/xensource/installer/constants.py

Change GPT_SUPPORT = True to GPT_SUPPORT = False to disable GPT and use MBR partition tables. You can specify the value of root_size from 4096 (the default) to a larger number which you want bigger root partition.

  • save and exit from vi editor.
  • Type exit and the installer should start.

Once the installation is complete, check your increased xenserver root partition size.

increase root partition size xenserver

 
Errors :

when you have normal xenserver installation will receive “new partition table could be written”

Solution:

Try to disable GPT as per our previous intruction. Otherwise you can use the below method.
1. Boot from the XenServers 6.0.0 install CDROM.

2. At the Xen 6.0.0 install prompt type menu.c32 and press enter.

3. When you get the new menu screen press TAB

4. add disable-gpt just before the last — then press enter.
The system will go through part of the pre-install boot process.

5. At the bash prompt type “exit”.

Installation will continue without any issue.