Multiple Tomcat Load balancing on single VM

Multiple Tomcat Load Balancing on single VM with Highly-Available HAproxy

Apache Tomcat is an open source software implementation of the Java Servlet and JavaServer Pages technologies. The Java Servlet and JavaServer Pages specifications are developed under the Java Community Process. Apache Tomcat powers numerous large-scale, mission-critical web applications across a diverse range of industries and organizations.

multiple tomcat

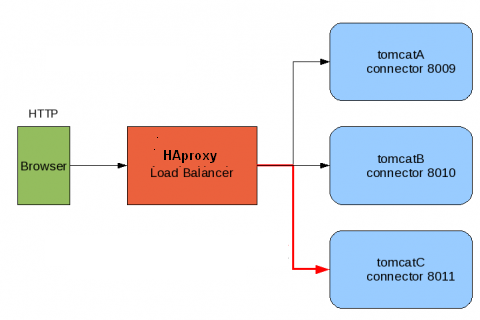
We have lot of tomcat load balance method but this is simple method to load balance your tomcat application. Lets we discuss multiple Tomcat Load Balancing on single VM.

Important Tomcat Server ports

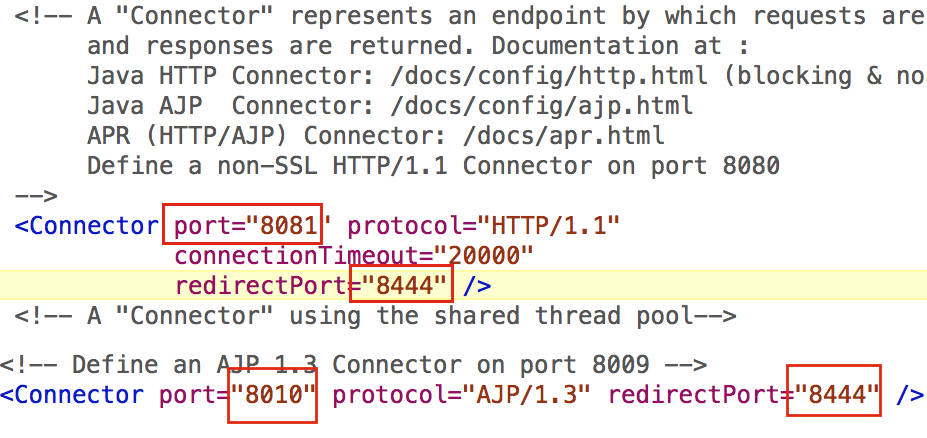
Connector Port : This is the port where Apache Tomcat listen for the HTTP requests.

Shutdown Port : This port is used when we try to shutdown the Apache Tomcat Server.

AJP (Apache JServ Protocol) Connector Port : The Apache JServ Protocol (AJP) is a binary protocol that can conduct inbound  requests from a web server through to an application server that sits behind the web server.

Redirect Port : Any redirection happening inside Apache Tomcat will happen through this port. In Apache TOMCAT there are two instance where redirectPort is mentioned. First one is for the Apache TOMCAT server and other one is for the AJP port.

Do you want to load balance your multiple tomcat on single VM?

Download tomcat on your server different paths and extract it looks like the following folders (tomcat1 and tomcat2).

Tomcat uses a port (defaults to 8005) as a shutdown port. What this means is that to stop all webapps and stop Tomcat cleanly the shutdown scripts make a connection to this port and send the shutdown command.

The startup.sh and shutdown.sh script files make use of catalina.sh for performing the startup and shutdown operations. We shall edit catalina.sh it

Tomcat1

cd /usr/local/tomcat1/bin

vi catalina.sh

export CATALINA_HOME=/usr/local/tomcat1
export CATALINA_BASE= /usr/local/tomcat1

Tomcat2

cd /usr/local/tomcat2/bin

vi catalina.sh

export CATALINA_HOME=/usr/local/tomcat2
export CATALINA_BASE= /usr/local/tomcat2


You can optimize HTTP, HTTPS, AJP, Shutdown Ports for tomcat2. This will resolve tomcat ports conflict. open your server.xml and change ports.

vi  conf/server.xml


Apache Tomcat Server
Thats all!!. You can start both tomcat and check with listen ports.

Start both tomcat1 and tomcat2.

#cd /usr/local/tomcat1/bin
# ./startup.sh
Using CATALINA_BASE: /usr/local/tomcat1
Using CATALINA_HOME: /usr/local/tomcat1
Using CATALINA_TMPDIR: /usr/local/tomcat1/temp
Using JRE_HOME: /usr
Using CLASSPATH: /usr/local/tomcat1/bin/bootstrap.jar:/usr/local/tomcat1/bin/tomcat-juli.jar
Tomcat started.
Check tomcat listening properly.

# lsof -i tcp:8080
COMMAND PID USER FD TYPE DEVICE SIZE/OFF NODE NAME
java 3830 root 42u IPv6 17199 0t0 TCP *:webcache (LISTEN)
# lsof -i tcp:8081
COMMAND PID USER FD TYPE DEVICE SIZE/OFF NODE NAME
java 3059 root 42u IPv6 16143 0t0 TCP *:simplifymedia (LISTEN)


Install and Configure HAproxy loadbalancer

use this steps to install haproxy http://www.cloudkb.net/rabbitmq-cluster-setup-haproxy/
once the installation completed, open your haproxy configuration.

#vi /etc/haproxy/haproxy.cfg

Add below settings ( 192.168.1.133 is virtual public IP and 10.1.1.10 is local ip)

listen tomcat 192.168.1.133:8089
mode http
balance roundrobin
server tomcathost 10.1.1.10:8087 check inter 5s rise 2 fall 3
server tomcathost 10.1.1.10:8081 check inter 5s rise 2 fall 3
Restart haproxy

# /etc/init.d/haproxy restart
Stopping haproxy: [ OK ] Starting haproxy: [ OK ] Make sure your virtual port is open on firewall and browse now.

http://192.168.1.133:8089

This will display tomcat webapps/ROOT folder content.

In order to test load balance, you should shutdown tomcat1 or tomcat2 and check the content.

/usr/local/tomcat1/bin/shutdown.sh


Rabbitmq cluster setup with HAproxy

Install RabbitMQ

Use the following steps to install RabbitmQ

http://www.cloudkb.net/rabbitmq-installation-centos/

Create the RabbiMQ Cluster

Clustering connects multiple nodes to form a single logical broker. Virtual hosts, exchanges, users and permissions are mirrored across all nodes in a cluster. A client connecting to any node can see all the queues in a cluster.

Clustering enables high availability of queues and increases the throughput.

A node can be a Disc node or RAM node. RAM node keeps the message state in memory with the exception of queue contents which can reside on a disk if the queue is persistent or too big to fit into memory.

RAM nodes perform better than Disc nodes because they don’t have to write to a disk as much as disk nodes. But, it is always recommended to have disk nodes for persistent queues.

RabbitMQ Cluster

We have used the following servers as Master and slave for Rabbitmq cluster setup with HAproxy.

rabbitmaster = 192.168.1.182
rabbitslave = 192.168.1.185
haproxy = 192.168.1.188
Stop RabbitMQ in Master and slave nodes and make sure service is stopped properly.

[root@rabbitmaster ~]# /etc/init.d/rabbitmq-server stop
Copy the file below to all nodes from the master. This cookie file needs to be the same across all nodes.

[root@rabbitmaster ~]# cat /var/lib/rabbitmq/.erlang.cookie
copy .erlang.cookie file to your nodes

Start RabbitMQ in master and all nodes.

[root@rabbitmaster ~]# /etc/init.d/rabbitmq-server start

Then run the following commands in all the nodes, except the master node:

[root@rabbitslave ~]# rabbitmqctl stop_app

[root@rabbitslave ~]# rabbitmqctl reset

[root@rabbitslave ~]# rabbitmqctl start_app
Now, run the following commands in the master node:

[root@rabbitmaster ~]# rabbitmqctl stop_app

[root@rabbitmaster ~]# rabbitmqctl reset
Use the following command is executed to join the slaves to the cluster.

[root@rabbitmaster ~]# rabbitmqctl join_cluster rabbit@rabbitslave
Clustering node rabbit@rabbitmaster with rabbit@rabbitslave …
…done.
Check the cluster status after execute it

[root@rabbitmaster ~]# rabbitmqctl cluster_status
Cluster status of node rabbit@rabbitmaster …
[{nodes,[{disc,[rabbit@rabbitmaster,rabbit@rabbitslave]}]}] …done.
Setup HA Policy for your all cluster nodes

[root@rabbitmaster ~]# rabbitmqctl start_app
Starting node rabbit@rabbitmaster …
…done.
[root@rabbitmaster ~]# rabbitmqctl set_policy ha-all “” ‘{“ha-mode”:”all”,”ha-sync-mode”:”automatic”}’
Setting policy “ha-all” for pattern [] to “{\”ha-mode\”:\”all\”,\”ha-sync-mode\”:\”automatic\”}” with priority “0” …
…done.

Install Management Plugin

The rabbitmq-management plugin provides an HTTP-based API for management and monitoring of your RabbitMQ server, along with a browser-based UI and a command line tool.
[root@rabbitmaster ~]# rabbitmq-plugins enable rabbitmq_management
The following plugins have been enabled:
mochiweb
webmachine
rabbitmq_web_dispatch
amqp_client
rabbitmq_management_agent
rabbitmq_management
Plugin configuration has changed. Restart RabbitMQ for changes to take effect.


Reset RabbitMQ admin password

#rabbitmqctl add_user demo demo
#rabbitmqctl set_user_tags demo administrator
#rabbitmqctl set_permissions -p / demo “.*” “.*” “.*”
Once it will be finished, connect web UI at: http://server-name:15672/

create test queues.

Go to your slave server and check that queue

[root@rabbitslave ~]# rabbitmqctl list_queues
Listing queues …
test 0
…done.

HAproxy

HAProxy is a free, very fast and reliable solution offering high availability, load balancing, and proxying for TCP and HTTP-based applications. Install haproxy on your main server or any other server which you want.

Create a load balance in front of it and map the backend RabbitMQ instance.
#yum install haproxy

Edit /etc/haproxy/haproxy.cfg and create a simple TCP proxy for RabbitMQ.

#vi /etc/haproxy/haproxy.cfg

global
daemon

defaults
mode tcp
maxconn 10000
timeout connect 5s
timeout client 100s
timeout server 100s

listen rabbitmq 192.168.1.188:5670
mode tcp
balance roundrobin
server rabbitmaster 192.168.1.182:5672 check inter 5s rise 2 fall 3
server rabbitslave 192.168.1.185:5672 check inter 5s rise 2 fall 3

[root@haproxy ~]# service haproxy restart
This setup will listen rabbitmq (192.168.1.182, 192.168.1.185 ) on port 5670 with ip address 192.168.1.188.

You have done RabbitMQ clustering with HAproxy configuration!!
If possible, you can setup on each of the RabbitMQ cluster nodes configuration and restart rabbitmq.

Edit /etc/rabbitmq/rabbitmq.config
[{rabbit,
[{cluster_nodes, {[‘rabbit@rabbitmaster’, ‘rabbit@rabbitslave’], ram}}]}].

Errors :

If you receive these errors, start_app and then try to set ha policy.

[root@rabbitmaster ~]# rabbitmqctl set_policy ha-all “” ‘{“ha-mode”:”all”,”ha-sync-mode”:”automatic”}’
Setting policy “ha-all” for pattern [] to “{\”ha-mode\”:\”all\”,\”ha-sync-mode\”:\”automatic\”}” with priority “0” …
Error: {badarg,[{ets,lookup,[rabbit_registry,{runtime_parameter,policy}]},
{rabbit_registry,lookup_module,2},
{rabbit_runtime_parameters,lookup_component,1},
{rabbit_runtime_parameters,set_any0,5},
{rabbit_runtime_parameters,set_any,5},
{rpc,’-handle_call_call/6-fun-0-‘,5}]}

# rabbitmqctl start_app


MySQL Master and Slave replication

Replication enables data from one MySQL database server (the master) to be replicated to one or more MySQL database servers (the slaves). Replication is asynchronous, This means your Slave servers do not need to be connected permanently to receive updates from the Master, For example, you could stop the Slave thread on the Slave server and start it back up at a later time and it would automatically catch itself up to the Master.

mysql master and slave

How to setup MySQL Master and Slave Replication?

We have tested MySQL Master and Slave replication with two centOS servers.

Master : 192.168.1.133

mysql2 : 192.168.1.136

master my.cnf

vi my.cnf

[mysqld]
log-bin=mysql-bin
server-id=1

mysql2

[mysqld]
log-bin=mysql-bin
server-id=2
Master

mysql> create user ‘replicator’@’%’ identified by ‘password’;
mysql>grant replication slave on *.* to ‘replicator’@’%’;
mysql> show master status;
+——————+———-+————–+——————+
| File | Position | Binlog_Do_DB | Binlog_Ignore_DB |
+——————+———-+————–+——————+
| mysql-bin.000001 | 342 | | |
+——————+———-+————–+——————+
then goto mysql2 and login mysql with root privileges.
mysql> create user ‘replicator’@’%’ identified by ‘password’;
mysql> grant replication slave on *.* to ‘replicator’@’%’;

mysql> slave stop; CHANGE MASTER TO MASTER_HOST = ‘192.168.1.133’, MASTER_USER = ‘replicator’, MASTER_PASSWORD = ‘password’, MASTER_LOG_FILE = ‘mysql-bin.000001’, MASTER_LOG_POS = 342; slave start;

mysql> SHOW MASTER STATUS;
+——————+———-+————–+——————+
| File | Position | Binlog_Do_DB | Binlog_Ignore_DB |
+——————+———-+————–+——————+
| mysql-bin.000001 | 106 | | |
+——————+———-+————–+——————+
Goto Master server and run
mysql>slave stop; CHANGE MASTER TO MASTER_HOST = ‘192.168.1.136’, MASTER_USER = ‘replicator’, MASTER_PASSWORD = ‘password’, MASTER_LOG_FILE = ‘mysql-bin.000001’, MASTER_LOG_POS = 106; slave start;
Thats all

mysql>create database example;

mysql>create table example.dummy (`id` varchar(10));

check database example with mysql2 server.