LDAP integration with openstack Keystone

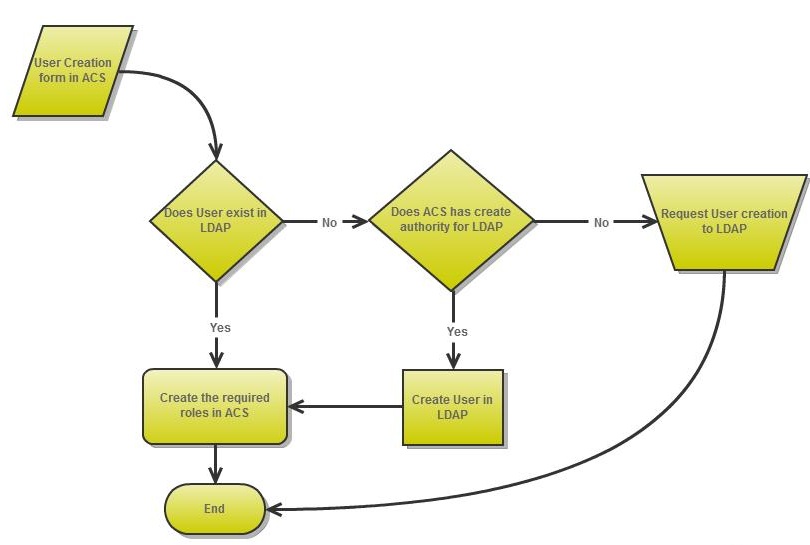
Keystone supports integration with an existing LDAP directory for authentication and authorization services. I have tested this schema with Ubuntu 14.04, CentOS 6.4 openLDAP with openstack icehouse and its successfully connected. Use the following steps to LDAP integration with openstack Keystone.

Install LDAP on Ubuntu or Centos

sudo apt-get install slapd ldap-utils

sudo dpkg-reconfigure slapd

set Domain Name to openstack.org Set organization to openstack
ldapsearch -x -W -D”cn=admin,dc=openstack,dc=org” -b dc=openstack,dc=org }}
create openstack.ldif file and update the following openstack schema.
vi openstack.ldif

# extended LDIF
#
# LDAPv3
# base <dc=example,dc=com> with scope subtree
# filter: (objectclass=*)
# requesting: ALL
#

# example.com
dn: dc=example,dc=com
objectClass: top
objectClass: dcObject
objectClass: organization
o: example Inc
dc: example

# admin, example.com
dn: cn=admin,dc=example,dc=com
objectClass: simpleSecurityObject
objectClass: organizationalRole
cn: admin
description: LDAP administrator

# Users, example.com
dn: ou=Users,dc=example,dc=com
ou: users
objectClass: organizationalUnit

# Roles, example.com
dn: ou=Roles,dc=example,dc=com
ou: roles
objectClass: organizationalUnit

# Tenants, example.com
dn: ou=Tenants,dc=example,dc=com
ou: tenants
objectClass: organizationalUnit

# demo, Users, example.com
dn: cn=demo,ou=Users,dc=example,dc=com
cn: demo
displayName: demo
givenName: demo
mail: demo@example.com
objectClass: inetOrgPerson
objectClass: top
sn: demo
uid: demo

# admin, Tenants, example.com
dn: cn=admin,ou=Tenants,dc=example,dc=com
objectClass: groupOfNames
description: Openstack admin Tenant
member: cn=admin,ou=Users,dc=example,dc=com
ou: admin
cn: admin

# admin, Users, example.com
dn: cn=admin,ou=Users,dc=example,dc=com
objectClass: person
objectClass: inetOrgPerson
sn: admin
cn: admin

# admin, Roles, example.com
dn: cn=admin,ou=Roles,dc=example,dc=com
objectClass: organizationalRole
ou: admin
cn: admin

# _member_, admin, Tenants, example.com
dn: cn=_member_,cn=admin,ou=Tenants,dc=example,dc=com
objectClass: organizationalRole
roleOccupant: cn=admin,ou=Users,dc=example,dc=com
roleOccupant: cn=gopal,ou=Users,dc=example,dc=com
cn: _member_

# _member_, Roles, example.com
dn: cn=_member_,ou=Roles,dc=example,dc=com
objectClass: organizationalRole
ou: _member_
cn: _member_

# demo, Tenants, example.com
dn: cn=demo,ou=Tenants,dc=example,dc=com
objectClass: groupOfNames
cn: demo
member: cn=demo,ou=Users,dc=example,dc=com
description: Openstack demo Tenant
ou: demo

# admin, demo, Tenants, example.com
dn: cn=admin,cn=demo,ou=Tenants,dc=example,dc=com
objectClass: organizationalRole
roleOccupant: cn=demo,ou=Users,dc=example,dc=com
cn: admin

# admin, admin, Tenants, example.com
dn: cn=admin,cn=admin,ou=Tenants,dc=example,dc=com
objectClass: organizationalRole
roleOccupant: cn=admin,ou=Users,dc=example,dc=com
roleOccupant: cn=amal,ou=Users,dc=example,dc=com
cn: admin

# nova, Users, example.com
dn: cn=nova,ou=Users,dc=example,dc=com
objectClass: person
objectClass: inetOrgPerson
sn: nova
cn: nova

# service, Tenants, example.com
dn: cn=service,ou=Tenants,dc=example,dc=com
objectClass: groupOfNames
ou: service
description: Openstack service Tenant
cn: service
member: cn=cinder,ou=Users,dc=example,dc=com
member: cn=nova,ou=Users,dc=example,dc=com

# cinder, Users, example.com
dn: cn=cinder,ou=Users,dc=example,dc=com
objectClass: person
objectClass: inetOrgPerson
sn: cinder
cn: cinder

# admin, service, Tenants, example.com
dn: cn=admin,cn=service,ou=Tenants,dc=example,dc=com
objectClass: organizationalRole
roleOccupant: cn=nova,ou=Users,dc=example,dc=com
roleOccupant: cn=cinder,ou=Users,dc=example,dc=com
cn: admin

# gopal, Users, example.com
dn: cn=gopal,ou=Users,dc=example,dc=com
objectClass: person
objectClass: inetOrgPerson
cn: gopal
sn: gopal

# search result
search: 2
result: 0 Success

# numResponses: 21
# numEntries: 20

Add openstack.ldif ldap schema

ldapadd -x -W -D”cn=admin,dc=example,dc=com” -f openstack.ldif

Thats all!!!

Update nova, cinder, admin, demo user account passwords via LDAP client according to nova.conf cinder.conf password settings.


Once successfully added, login your openstack keystone server.
For OpenStack Identity to access an LDAP back end, you must enable the authlogin_nsswitch_use_ldap boolean value for SELinux on the Identity server.

# setsebool -P authlogin_nsswitch_use_ldap

Enable the LDAP driver in the keystone.conf file and update the following settings

admin_workers = 2
max_token_size = 16384
debug = True
admin_bind_host = 192.168.1.183
member_role_name = _member_
member_role_id = 9fe2ff9ee4384b1894a90878d3e92bab

[identity]
#driver = keystone.identity.backends.sql.Identity
driver = keystone.identity.backends.ldap.Identity

[assignment]
driver = keystone.assignment.backends.sql.Assignment


LDAP integration with openstack Keystone, Define the destination LDAP server in the keystone.conf file:
[ldap]

url = ldap://192.168.1.183
user = cn=admin,dc=example,dc=com
password = secret
suffix = cn=example,cn=com
use_dumb_member = False
tree_dn = dc=example,dc=com

user_tree_dn = ou=Users,dc=example,dc=com
user_objectclass = inetOrgPerson
user_id_attribute = cn

role_tree_dn = ou=Roles,dc=example,dc=com
role_objectclass = organizationalRole
role_id_attribute = cn
role_member_attribute = roleOccupant

tenant_tree_dn = ou=Tenants,dc=example,dc=com
tenant_objectclass = groupOfNames
tenant_id_attribute = cn

user_allow_create = True
user_allow_update = True
user_allow_delete = True

tenant_allow_create = True
tenant_allow_update = True
tenant_allow_delete = True

role_allow_create = True
role_allow_update = True
role_allow_delete = True


service keystone restart

You are almost done!! Try to login your openstack and if you are received authorized error, please use the following steps.

Solution1:

You are not authorized for any projects

Update admin user account for project authorization and role.

use keystonerc admin credential to update via command line

example:

vi  keystonerc_admin

export OS_USERNAME=admin
export OS_TENANT_NAME=admin
export OS_PASSWORD=secret
export OS_AUTH_URL=http://192.168.1.183:5000/v2.0/
export PS1='[\u@\h \W(keystone_admin)]\$ ‘
export SERVICE_ENDPOINT=http://192.168.1.183:35357/v2.0/
export SERVICE_TOKEN=048f27d46b4f4eddb057f5f8b529d599

#./keystonerc_admin

Authorize your default users for projects.

[root@ldappack ~]#keystone user-role-add –user=admin –role=admin –tenant=admin

[root@ldappack ~]# keystone user-role-add –user=nova –role=admin –tenant=services
[root@ldappack ~]# keystone user-role-add –user=neutron –role=admin –tenant=services
[root@ldappack ~]# keystone user-role-add –user=swift –role=admin –tenant=services
[root@ldappack ~]# keystone user-role-add –user=cinder –role=admin –tenant=services
[root@ldappack ~]# keystone user-role-add –user=glance –role=admin –tenant=services
[root@ldappack ~]# keystone user-role-add –user=ceilometer –role=admin –tenant=services

login your openstack with admin credential.


Solution2:
Check your ldap write permission if you have any permission issue while modify.

/etc/ldap/slapd.d/cn\=config/olcDatabase\=\{2\}hdb.ldif

olcAccess: {3}to * by dn=”cn=admin,dc=example,dc=com” write by * write


Enable LDAP authentication for Cloudstack

LDAP stands for Lightweight Directory Access Protocol. As the name suggests, it is a lightweight protocol for accessing directory services, specifically X.500-based directory services. LDAP runs over TCP/IP or other connection oriented transfer services. LDAP is an IETF Standard Track protocol and is specified in “Lightweight Directory Access Protocol (LDAP).

You can use an external LDAP server such as Microsoft Active Directory or ApacheDS or openLDAP to authenticate CloudStack end-users. CloudStack will search the external LDAP directory tree starting at a specified base directory and gets user info such as first name, last name, email and username.

cloudstack LDAP

I have used the following setup to authenticate cloudstack from the openldap directory. This has been successfully tested with cloudstack 4.4.2.


Install openLDAP on CentOS server

#yum install openldap openldap-clients openldap-servers
#cp /usr/share/openldap-servers/slapd.conf.obsolete /etc/openldap/slapd.conf
#slappasswd

copy the result of that command

#vi /etc/openldap/slapd.conf

change your
access to *
by dn.exact=”gidNumber=0+uidNumber=0,cn=peercred,cn=external,cn=auth” read
by dn.exact=”cn=Manager,dc=cloudstack,dc=com” read
by * none
by * write
database bdb
suffix “dc=cloudstack,dc=com”
checkpoint 1024 15
rootdn “cn=Manager,dc=cloudstack,dc=com”

#paste slappasswd command result
rootpw {SSHA}pAQ8d8G3zH8rjbwKdQWBS9mS27fHJPuf
#rm -rf /var/lib/ldap/*

#rm -rf /etc/openldap/slapd.d/*

#cp /usr/share/openldap-servers/DB_CONFIG.example /var/lib/ldap/DB_CONFIG

#chown -Rf ldap. /etc/openldap/slapd.d/

#chown -Rf ldap. /var/lib/ldap/

#chmod 700 /var/lib/ldap/

#chmod 700 /etc/openldap/slapd.d/

#/etc/init.d/slapd restart

#slaptest -u

#slaptest -f /etc/openldap/slapd.conf -F /etc/openldap/slapd.d
Add openldap schema for cloudstack
vi cloudstack.ldif

# fogpanel.com
dn: dc=fogpanel,dc=com
objectClass: dcObject
objectClass: organization
o: fogpanel Company
dc: fogpanel

# admin, fogpanel.com
dn: cn=admin,dc=fogpanel,dc=com
cn: admin
objectClass: organizationalRole
objectClass: top
objectClass: simpleSecurityObject
userPassword:: bDN0bTNpbg==

# Users, fogpanel.com
dn: ou=Users,dc=fogpanel,dc=com
ou: Users
objectClass: organizationalUnit
objectClass: top

# gopal, Users, fogpanel.com
dn: cn=gopal,ou=Users,dc=fogpanel,dc=com
uid: gopal
sn: gopal
userPassword:: bDN0bTNpbg==
cn: gopal
objectClass: inetOrgPerson
objectClass: organizationalPerson
objectClass: person
objectClass: top
mail: gopal@assistanz.com
givenName: gopal

# user1, Users, fogpanel.com
dn: cn=user1,ou=Users,dc=fogpanel,dc=com
uid: user1
sn: user1
userPassword:: bDN0bTNpbg==
cn: user1
objectClass: inetOrgPerson
objectClass: organizationalPerson
objectClass: person
objectClass: top

# admin, Users, fogpanel.com
dn: cn=admin,ou=Users,dc=fogpanel,dc=com
uid: admin
sn: admin
userPassword:: Zm9ncGFuZWxhbWFs
cn: admin
objectClass: inetOrgPerson
objectClass: organizationalPerson
objectClass: person
objectClass: top

#ldapadd -x -W -D “cn=Manager,dc=cloudstack,dc=com” -f cloudstack.ldif
Once completed, login your cloudstack and given the Global settings ldap configurations.

ldap.basedn : ou=Users,dc=fogpanel,dc=com

ldap.bind.password : <password>

ldap.bind.principal : cn=Manager,dc=fogpanel,dc=com

ldap.email.attribute : mail

ldap.firstname.attribute : givenName

ldap.lastname.attribute : sn

ldap.username.attribute : uid

ldap.user.object : inetOrgPerson

Done!! click – > Global Settings – > Select View : LDAP configuration -> click Configure LDAP

example settings

Hostname : 192.168.1.185
port : 389

Thats all!!!
Click cloudstack – > Accounts -> LDAP account

You can create ldap account through cloudstack and give user role.


How to change keystone API V2 to V3

The Keystone Identity Service allows clients to obtain tokens that can be used to access OpenStack cloud services. This document is intended for software developers interested in developing applications that utilize the Keystone Identity Service API for authentication. The OpenStack Identity API is implemented using a RESTful web service interface. All requests to authenticate and operate against the OpenStack Identity API should be performed using SSL over HTTP (HTTPS) on TCP port 443.

keystone V3 Advantages

1) Authentication is totally pluggable. You can write our own custom auth method. Beause of this extensible auth method, now keystone supports oauth1, federation ( federation is not fully done)

2) Authorization : V2 is either “admin” or none. In v3 you can control who can call each method. ( Provided you define your own policy file )

3) Separate drivers for assignments and identity

4) Rich set of APIs. There are lot more API available than v2.0. Also there are no vendor specic extension. If you check v2.0, most of the role apis are Rackspace extensions
Before proceed to migrate keystone v2 to v3, you must check previous services are working fine. Use the following commands to verify the list of services works.

How to change keystone API V2 to V3?

[root@localhost ~(keystone_admin)]# keystone user-list
WARNING: Bypassing authentication using a token & endpoint (authentication credentials are being ignored).
+———————————-+————+———+———————-+
| id | name | enabled | email |
+———————————-+————+———+———————-+
| ed03407c56054729bee58be7f7710786 | admin | True | root@localhost |
| 3b52f88a70f149a791e295b1859ae8f4 | ceilometer | True | ceilometer@localhost |


[root@localhost ~(keystone_admin)]# nova service-list
+——————+———–+———-+———+——-+—————————-+—————–+
| Binary | Host | Zone | Status | State | Updated_at | Disabled Reason |
+——————+———–+———-+———+——-+—————————-+—————–+
| nova-consoleauth | packstack | internal | enabled | up | 2014-12-13T10:45:52.000000 | – |
| nova-scheduler | packstack | internal | enabled | up | 2014-12-13T10:45:50.000000 | – |
| nova-conductor | packstack | internal | enabled | up | 2014-12-13T10:45:54.000000 | – |
| nova-compute | packstack | nova | enabled | up | 2014-12-13T10:45:51.000000 | – |
| nova-cert | packstack | internal | enabled | up | 2014-12-13T10:45:52.000000 | – |
| nova-console | packstack | internal | enabled | up | 2014-12-13T10:45:51.000000 | – |
+——————+———–+———-+———+——-+—————————-+—————–+
[root@localhost ~(keystone_admin)]# glance image-list
+————————————–+——–+————-+——————+———-+——–+
| ID | Name | Disk Format | Container Format | Size | Status |
+————————————–+——–+————-+——————+———-+——–+
| f4c137ca-8dd8-47f3-be70-106eac2f241f | cirros | qcow2 | bare | 13147648 | active |
+————————————–+——–+————-+——————+———-+——–+

If all the services are working fine then proceed to migrate endpoint urls to V3 in your keystone databases.  Login your mysql server and change endpoint URLs.
mysql> use keystone;
Reading table information for completion of table and column names
You can turn off this feature to get a quicker startup with -A

Database changed

mysql> select interface, url from endpoint e, service s where s.id=e.service_id and s.type=”identity”;
+———–+———————————-+
| interface | url |
+———–+———————————-+
| admin | http://192.168.1.133:35357/v2.0 |
| internal | http://192.168.1.133:5000/v2.0 |
| public | http://192.168.1.133:5000/v2.0 |
+———–+———————————-+
3 rows in set (0.01 sec)

Get the identity service ID

mysql> select id from service where type=”identity”;
+———————————-+
| id |
+———————————-+
| e32101fdfe4145d1a6a22351b41d88e5 |
+———————————-+
1 row in set (0.00 sec)
Use this query to replace URLs as per service id where 5000 ports
mysql> update endpoint set url=”http://192.168.1.196:5000/v3″ where url=”http://192.168.1.196:5000/v2.0″ and service_id=”76e23f322c2a48d18293db89dbca9e70″;
Query OK, 2 rows affected (0.00 sec)
Rows matched: 2 Changed: 2 Warnings: 0

Use this query to replace 35357 ports

mysql> update endpoint set url=”http://192.168.1.196:35357/v3″ where url=”http://192.168.1.196:35357/v2.0″ and service_id=”76e23f322c2a48d18293db89dbca9e70″;
Query OK, 1 row affected (0.00 sec)
Rows matched: 1 Changed: 1 Warnings: 0

Thats all, you can verify the changed URLs.

mysql> select interface, url from endpoint e, service s where s.id=e.service_id and s.type=”identity”;
+———–+——————————–+
| interface | url |
+———–+——————————–+
| admin | http://192.168.1.133:35357/v3 |
| internal | http://192.168.1.133:5000/v3 |
| public | http://192.168.1.133:5000/v3 |
+———–+——————————–+
3 rows in set (0.00 sec)

mysql>


upgrade Keystone Policy File

Policy is just a set of rules combined by or/and logic. It should become more readable in future releases, The Openstack Identity v3 API, provided by Keystone, offers features that were lacking in the previous version. Among these features, it introduces the concept of domains, allowing isolation of projects and users. For instance, an administrator allowed to create projects and users in a given domain, may not have any right in another one. While these features look very exciting, some configuration needs to be done to have a working identity v3 service with domains properly set.


Download policy.v3cloudsample.json file

wget https://github.com/openstack/keystone/blob/master/etc/policy.v3cloudsample.json
mv /etc/keystone/policy.json /etc/keystone/policy.json.V2

mv policy.v3cloudsample.json /etc/keystone/policy.json

chown keystone.keystone policy.json

Update Keystone Endpoint Environment.

export OS_USERNAME=admin
export OS_TENANT_NAME=admin
export OS_PASSWORD=<password>
export OS_AUTH_URL=http://192.168.1.133:5000/v3
export SERVICE_ENDPOINT=http://192.168.1.133:35357/v3

export SERVICE_TOKEN=c50f58a02dde43f286517af102786be0

Restart OpenStack Services

/etc/init.d/openstack-keystone restart

Troubleshooting

If you received “horizon unauthorized (http 401)” errors, you can revert back policy.json v2 file and try to restart services.


How to Enable Multi Domains on openstack horizon

Horizon supports multi domains as well. You need to add only a few changes to local_setting. Apply the correct policy.json file for keystone.
vi /etc/openstack-dashboard/local_settings

uncommand the following settings.

OPENSTACK_API_VERSIONS = {
“identity”: 3
}
OPENSTACK_KEYSTONE_MULTIDOMAIN_SUPPORT = True
OPENSTACK_KEYSTONE_URL = “http://192.168.1.133:5000/v3”
Save local_settings and restart openstack-dashboard.

/etc/init.d/httpd restart