How to update xenserver patches

Update Xenserver hotfix

Customers should use either XenCenter or the XenServer Command Line Interface (CLI) to install updates. When the installation is complete, restart the server for the update to take effect. As with any software update, back up your data before applying this hotfix. Citrix recommends updating all hosts within a pool sequentially. Upgrading of hosts should be scheduled to minimize the amount of time the pool runs in a “mixed state” where some hosts are upgraded and some are not. Running a mixed pool of updated and non-updated hosts for general operation is not supported.


xenserver_update
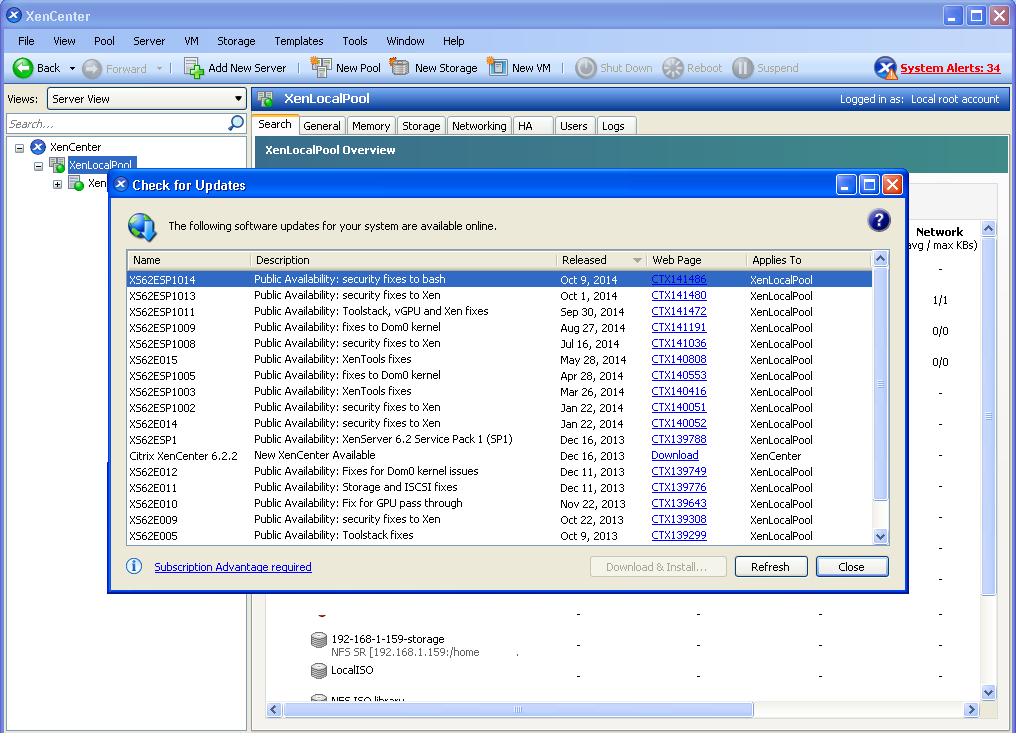
how to update xenserver patches? Download the XML document from http://updates.xensource.com/XenServer/updates.xml to get the information about the XenServer Versions, details of all the patches available and also to get the list of patches available per XenServer version.

Installing the update by using XenCenter

Download the update to a known location on a computer that has XenCenter installed.

In XenCenter, on the Tools menu, select Install Update. The Install Update wizard appears.

Click Next to start the Wizard.

Click Add to upload a new update.

Browse to the location where you downloaded the hotfix, select it and then click Open.

From the list of updates select XS62ESP1014.xsupdate and then click Next.

Select the hosts to which you want to apply the hotfix and then click Next.

Follow the recommendations to resolve any upgrade prechecks and then click Next.

Choose how to perform post-update tasks. In the Post update options section, select automatically or manually, and then click Install update.

When the installation process is complete, click Finish to exit the wizard.

Installing the update by using the xe Command Line Interface

Login your Xenserver host as root

Before download your hotfix zip file to your xenserver, please make sure you have enough disk space on /root partition. Because xenserver default having only 4.0G / partition.

Download the update files
[root@xen1 ~]#wget http://downloadns.citrix.com.edgesuite.net/9708/XS62ESP1014.zip

Extract the xsupdate file from the zip and Upload the xsupdate file

[root@xen1 ~]# unzip XS62ESP1014.zip
Archive: XS62ESP1014.zip
inflating: XS62ESP1014.xsupdate
inflating: XS62ESP1014-src-pkgs.tar.bz2

[root@xen1 ~]# xe patch-upload file-name=XS62ESP1014.xsupdate
4fc82e62-b938-407d-a2c6-68c8922f3ec2
Apply the hotfix to all hosts in the pool, specifying the UUID of the hotfix:

[root@xen1 ~]# xe patch-pool-apply uuid=4fc82e62-b938-407d-a2c6-68c8922f3ec2
if you will apply patch only on host server then update the following command with patch upload file UUID and hostserver UUID.

[root@xen1 ~]# xe patch-apply host-uuid=a1275000-e30f-454b-b1b4-0f082af4b43a uuid=4fc82e62-b938-407d-a2c6-68c8922f3ec2
The hotfix is applied to all hosts in the pool, but does not take effect until each host restarts. For each host, migrate the VMs that you wish to keep running, and shut down the remaining VMs before restarting the host.

Restart xenserver hosts.

or

If you want to run VMs and restart xapi service then Restart Toolstack

The Restart Toolstack option allows you to restart the XenServer management toolstack (also known as xapi). This toolstack controls VM lifecycle operations, host and VM networking, VM storage, user authentication, and allows the management of XenServer resource pools. xapi provides the publicly documented XenAPI Management Interface which is used by all tools that manage VMs and resource pools.

[root@xen1 ~]# xe-toolstack-restart
Executing xe-toolstack-restart
Stopping xapi: [ OK ] Stopping the v6 licensing daemon: [ OK ] Stopping the memory ballooning daemon: [ OK ] Stopping perfmon: [ OK ] Stopping the xenopsd daemon: [ OK ] Stopping XCP RRDD plugin xcp-rrdd-iostat: [ OK ] Stopping XCP RRDD plugin xcp-rrdd-squeezed: [ OK ] Stopping XCP RRDD plugin xcp-rrdd-xenpm: [ OK ] Stopping XCP RRDD plugin xcp-rrdd-gpumon: [ OK ] Stopping the XCP RRDD daemon: [ OK ] Stopping the XCP networking daemon: [ OK ] Stopping the fork/exec daemon: [ OK ] Starting the fork/exec daemon: [ OK ] Starting the XCP networking daemon: . [ OK ] Starting the XCP RRDD daemon: [ OK ] Starting XCP RRDD plugin xcp-rrdd-gpumon: [ OK ] Starting XCP RRDD plugin xcp-rrdd-iostat: [ OK ] Starting XCP RRDD plugin xcp-rrdd-squeezed: [ OK ] Starting XCP RRDD plugin xcp-rrdd-xenpm: [ OK ] Starting the xenopsd daemon: [ OK ] Starting perfmon: [ OK ] Starting the memory ballooning daemon: [ OK ] Starting the v6 licensing daemon: [ OK ] Starting xapi: OK [ OK ] done.


Install KVM hypervisor in CentOS

What is KVM?

KVM is an open source Kernel-based Virtualization Machine that is offering virtualization for Linux operating systems that enables Linux to function as a hypervisor for running multiple virtual machines (VMs).

KVM has been directly integrated into the Linux kernel as of 2007’s 2.6.20 Linux kernel release. KVM is the basis for both IBM’s and Red Hat’s Linux virtualization technologies, and it’s also the most widely used virtualization technology in the OpenStack cloud.

KVM is type-1 hypervisor that can be added to a most Linux operating systems including Ubuntu, SUSE, and Red Hat Enterprise Linux.

kvm-virtualization-schema

Hardware Requirements.

You must determine whether your system’s processor and/or hypervisor support hardware acceleration for virtual machines.

Run the following command:

# egrep -c ‘(vmx|svm)’ /proc/cpuinfo

If this command returns a value of one or greater, your system supports hardware acceleration which typically requires no additional configuration.

If this command returns a value of zero, your system does not support hardware acceleration and you can configure libvirt to use QEMU instead of KVM.
qemu-kvm: Core KVM package for managing VM’s through /dev/kvm file for interacting with direct hardware. This package contains KVM, libvirt-bin etc.

libvirt*: This proves us useful command line tool called virsh which is text-based tool to manage virtual machines.


Always use FQDN Domain Name

Configure FQDN (fully qualified domain name) for your host. Otherwise, you may get warnings while launching libvirtd daemon such as “getaddrinfo failed for ‘myhost’: Name or service not known”.

To configure FQDN, edit the following configuration file:

# vi /etc/sysconfig/network

HOSTNAME=server.domain.com

Disable SELinux

Before installing KVM, be aware that there are several SELinux booleans that can affect the behavior of KVM and libvirt.

To disable SELinux on CentOS:

#vi /etc/selinux/config

SELINUX=disabled

Reboot the machine for the change to take effect.

How to install KVM in CentOS

Use the below steps to install KVM hypervisor in Centos and other modules.

#yum install kvm libvirt python-virtinst qemu-kvm

Start libvirtd daemon, and set it to auto-start:

# service libvirtd start
# chkconfig libvirtd on

Check if KVM has successfully been installed. You can list all the virtual machines with no error as follows.

#virsh list –all

Id                                                 Name State
—————————————————-


Setup Linux Bridge for VMs Networking

Installing KVM alone does not allow VMs to communicate with each other or access external networks. You need to configure VM networking separately. use the blow tutorial to setup linux bridge on centos.

http://www.cloudkb.net/setup-network-bonding-bridge-centos/


How to install VirtManager

The virt-manager application is a desktop user interface for managing virtual machines through libvirt. It primarily targets KVM VMs, but also manages Xen and LXC (linux containers). It presents a summary view of running domains, their live performance & resource utilization statistics. Use the following command to install it.

#yum install virt-manager libvirt qemu-system-x86 openssh-askpass libcanberra-devel

Once the installation completed. You can launch the VirtManager locally using CentOS desktop machine.

#virt-manager


virtmanager

Remote VirtManager

If you are using CentOS server without desktop UI, follow these steps to launch VirtManager.

Enable X11 forwarding on SSH server:

#yum install xauth

#vi /etc/ssh/sshd_config

X11Forwarding yes

#service sshd restart

Create a following executable “wrapper” script for virt-manager.

#vi /usr/bin/vm

#! /bin/bash
xauth list | while read line; do
sudo -i xauth add $line
done
sudo -i virt-manager

#chmod 755 /usr/bin/vm
Thats all.. Connect to your CentOS server from a separate desktop machine, and run the wrapper script vm to launch VirtManager remotely.

#ssh -X root@server.domain.com


Solutions:-

1. If you see the following error when attempting to launch VirtManager remotely, make sure that you use the wrapper script (vm) to launch it, as described above.

X11 connection rejected because of wrong authentication.
Traceback (most recent call last):
File “/usr/share/virt-manager/virt-manager.py”, line 383, in
main()
File “/usr/share/virt-manager/virt-manager.py”, line 286, in main
raise gtk_error
RuntimeError: could not open display

2. If you see the following D-Bus error:

D-Bus library appears to be incorrectly set up; failed to read machine
uuid: UUID file ‘/var/lib/dbus/machine-id’

Then run the command below and reboot the host machine.

# sh -c ‘dbus-uuidgen > /var/lib/dbus/machine-id’
3. If you have font issue while running VirtManager, install the following font, and relaunch it.

#yum install dejavu-lgc-sans-fonts


RabbitMQ installation on CentOS

AMQP

The Advanced Message Queuing Protocol (AMQP) is an open standard application layer protocol for message-oriented middleware. The defining features of AMQP are message orientation, queuing, routing (including point-to-point and publish-and-subscribe), reliability and security.

RabbitMQ

RabbitMQ is open source message broker software (sometimes called message-oriented middleware) that implements the Advanced
Message Queuing Protocol (AMQP). The RabbitMQ server is written in the Erlang programming language and is built on the Open Telecom Platform framework for clustering and failover.

RabbitMQ comes with default built-in settings which will most likely be sufficient for running your RabbitMQ server effectively. If it runs fine, then you probably don’t need any configuration at all. Mostly CloudStack and Openstack used RabbitMQ to exchange messages.

example-rabbitmq-routing

Features,

Reliability
RabbitMQ offers a variety of features to let you trade off performance with reliability, including persistence, delivery acknowledgements, publisher confirms, and high availability.

Flexible Routing
Messages are routed through exchanges before arriving at queues. RabbitMQ features several built-in exchange types for typical routing logic. For more complex routing you can bind exchanges together or even write your own exchange type as a plugin.

Clustering
Several RabbitMQ servers on a local network can be clustered together, forming a single logical broker.

Federation
For servers that need to be more loosely and unreliably connected than clustering allows, RabbitMQ offers a federation model.

Highly Available Queues
Queues can be mirrored across several machines in a cluster, ensuring that even in the event of hardware failure your messages are safe.

Multi-protocol
RabbitMQ supports messaging over a variety of messaging protocols.

Many Clients
There are RabbitMQ clients for almost any language you can think of.

Management UI
RabbitMQ ships with an easy-to use management UI that allows you to monitor and control every aspect of your message broker.

Tracing
If your messaging system is misbehaving, RabbitMQ offers tracing support to let you find out what’s going on.

Plugin System
RabbitMQ ships with a variety of plugins extending it in different ways, and you can also write your own.

RabbitMQ Installation on CentOS

Download Erlang Yum Repos RPM

#wget http://dl.fedoraproject.org/pub/epel/6/x86_64/epel-release-6-8.noarch.rpm

#rpm -ivh epel-release-6-8.noarch.rpm

Install Erlang

#yum install erlang

Download and Install RabbitMQ

#wget http://www.rabbitmq.com/releases/rabbitmq-server/v3.3.5/rabbitmq-server-3.3.5-1.noarch.rpm

#rpm -ivh rabbitmq-server-3.3.5-1.noarch.rpm

Start and verify RabbitMQ

Set RabbitMQ to start on boot and start it up immediately:

#chkconfig rabbitmq-server on
#/etc/init.d/rabbitmq-server start

Install RabbitMQ management console

#rabbitmq-plugins enable rabbitmq_management
Login RabbitMQ Web UI

Username is “guest”,
password is “guest”
http://<RABBITMQ-SERVER>:15672

Create RabbitMQ new user account and update password with admin permissions

#rabbitmqctl add_user demo demo
#rabbitmqctl set_user_tags demo administrator
#rabbitmqctl set_permissions -p / demo “.*” “.*” “.*”

Logging

Output from the server is sent to a RABBITMQ_NODENAME.log file in the RABBITMQ_LOG_BASE directory. Additional log data is written to RABBITMQ_NODENAME-sasl.log.

rabbitmqctl –help

Commands:
stop [<pid_file>] stop_app
start_app
wait <pid_file>
reset
force_reset
rotate_logs <suffix>

join_cluster <clusternode> [–ram] cluster_status
change_cluster_node_type disc | ram
forget_cluster_node [–offline] update_cluster_nodes clusternode
sync_queue queue
cancel_sync_queue queue
set_cluster_name name

add_user <username> <password>
delete_user <username>
change_password <username> <newpassword>
clear_password <username>
set_user_tags <username> <tag> …
list_users

add_vhost <vhostpath>
delete_vhost <vhostpath>
list_vhosts [<vhostinfoitem> …] set_permissions [-p <vhostpath>] <user> <conf> <write> <read>
clear_permissions [-p <vhostpath>] <username>
list_permissions [-p <vhostpath>] list_user_permissions <username>

set_parameter [-p <vhostpath>] <component_name> <name> <value>
clear_parameter [-p <vhostpath>] <component_name> <key>
list_parameters [-p <vhostpath>]

set_policy [-p <vhostpath>] [–priority <priority>] [–apply-to <apply-to>] <name> <pattern> <definition>
clear_policy [-p <vhostpath>] <name>
list_policies [-p <vhostpath>]

list_queues [-p <vhostpath>] [<queueinfoitem> …] list_exchanges [-p <vhostpath>] [<exchangeinfoitem> …] list_bindings [-p <vhostpath>] [<bindinginfoitem> …] list_connections [<connectioninfoitem> …] list_channels [<channelinfoitem> …] list_consumers [-p <vhostpath>] status
environment
report


Errors:


=ERROR REPORT==== 5-Dec-2014::09:13:20 ===
closing AMQP connection <0.31492.1> (192.168.120.10:38738 -> 192.168.120.25:5672):
{handshake_error,starting,0,
{amqp_error,access_refused,
“PLAIN login refused: user ‘guest’ can only connect via localhost”,
‘connection.start_ok’}}

Solution:

You should update rabbitmq host ip address instead of localhost (127.0.0.1)


Errors 2:
Error: Cannot retrieve metalink for repository: epel. Please verify its path and try again

change http instead of https in your repo file.
sudo sed -i “s/mirrorlist=https/mirrorlist=http/” /etc/yum.repos.d/epel.repo

Try to update again.